Table of Contents
Moodle (Modular Object-Oriented Dynamic Learning Environment) is one of the most used learning management system in the educative world. As open source software, it allows us to adapt it to our needs.
One of its main advantages reside in its vast community support and its extensible system that provides the institutions with a huge amount of resources to adapt and improve their courses.
Under this section, we will observe Moodle from the teacher’s perspective.
Minimum Requirements
The requirements to access a Moodle platform (from the side of the teachers and students) are quite simple:
Have an active internet connection
Use an updated browser (Microsoft Edge, Google Chrome, Mozilla Firefox)
Have a username and password to access the virtual platform
Given these conditions, users should not have any problem to access the resources of the e-learning platform.
Navigating Through the Platform
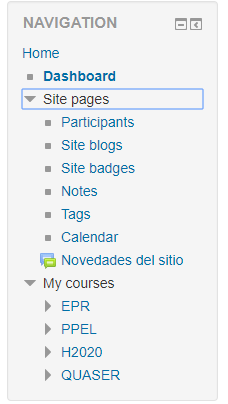 The left navigation menu allows for quickly moving between the main sections of the platform, such as:
- Home: the homepage of the platform. Usually hosts the course lists and the news and announcements.
- Dashboard: Private area of the user. It can be customised to show different aspects of the platform (like the calendar or the private files).
- My courses: Courses where the user is enrolled (either as teacher or as student).
When a teacher is inside of the course, another navigation module will appear called Administration. This menu will allow modifying any aspect of the course.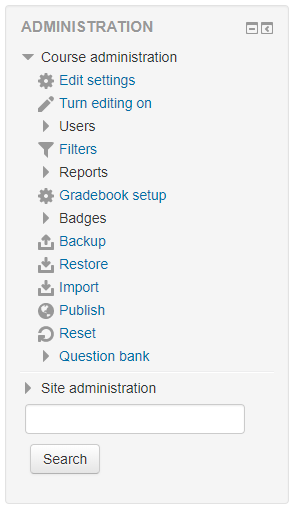
Creating and Managing Activities and Resources
Activities and resources compose the content of the courses. Whether it is a block of text, a quiz, a video or a link, every activity or resource is managed from the same place.
Some of the most common ones are the following:
Assignment
Allows the teacher to communicate tasks, collect work and provide grades and feedback. It is usually the main tool for grading the students.
It can ask the students to upload files (like PDF or Word documents), and to add a text commentary to it. A deadline can be set under which no more submissions will be allowed.
Forum
A common place for the students and teachers to communicate. Usually it is common to have a forum for the entire subject, but if the content is very diverse, a forum for each section can prove to be more useful.
Glossary
A list of definitions. Can have images and files attached, and can accept comments from the students or other teachers.
Lesson
A lesson is composed of several pages with text, images, videos and quizzes. It allows for non-linear lessons, meaning that depending on the choice of the student it can lead to different path. It is useful to create branching games.
Quiz
Enables the teacher to create quizzes and exams with various types of questions, including multiple choice, matching, short-answer and numerical.
File
Serving a file for the student to download. Usually for content that cannot be seen directly through the platform, like PDF or ZIP files.
URL
Similar to file, allows the teacher to add a link to another website.
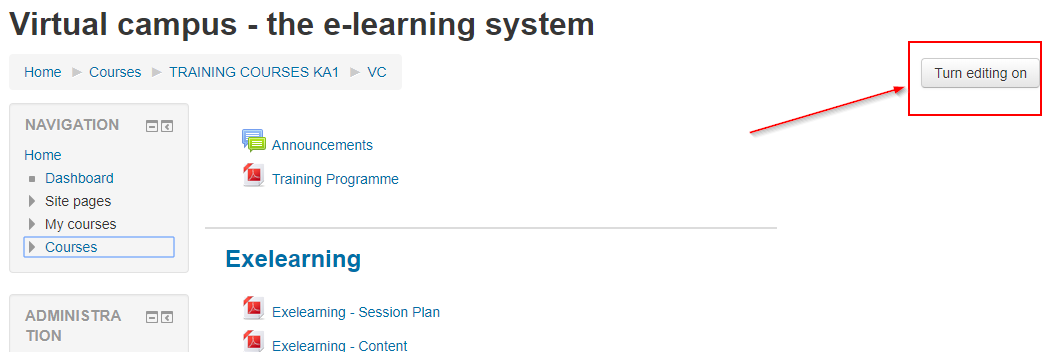
To start adding content to the course, the teacher needs to enable the editing mode. For that, the option to Turn editing on must be selected.
Under editing mode, we can add, edit, reorder and remove the content. To add new content, the teacher needs to select to Add an activity or resource.
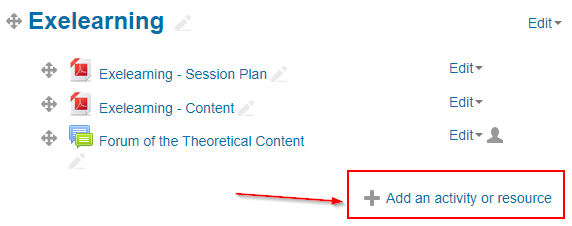
A new window with the different activities available in the platform will appear, as well as the description of it.
Enrolling Your Students
We can enrol new users in their course through Course administration -> Enrolled users. First, the student must exist as a user in the platform.
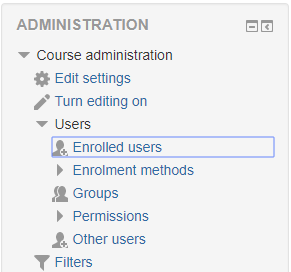
We will find the list of already enrolled users there, and a button that invites us to enrol more users.
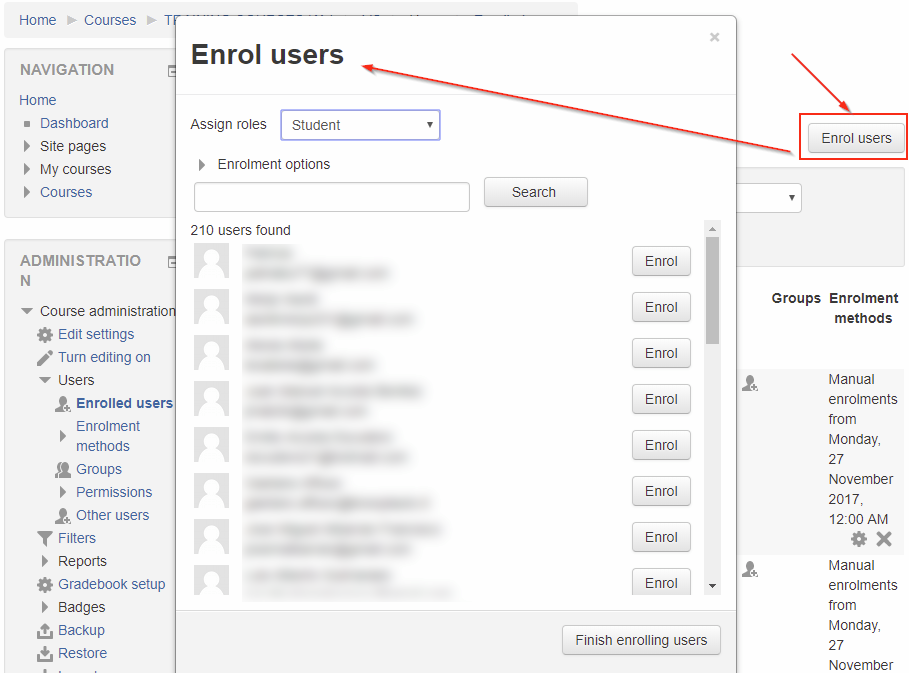
Where the teacher can assign the role and manually add as many users as needed.
Grading the Students with the Gradebook
We can automate the evaluation of the students through the Gradebook. The gradebook allows setting the weight that each activity will have on the final mark.
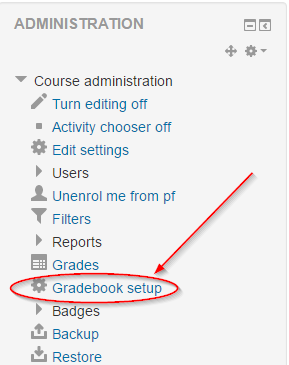
After generating all of the activities that are going to be measured for the grading, the teacher can access the gradebook setup from the administration module.
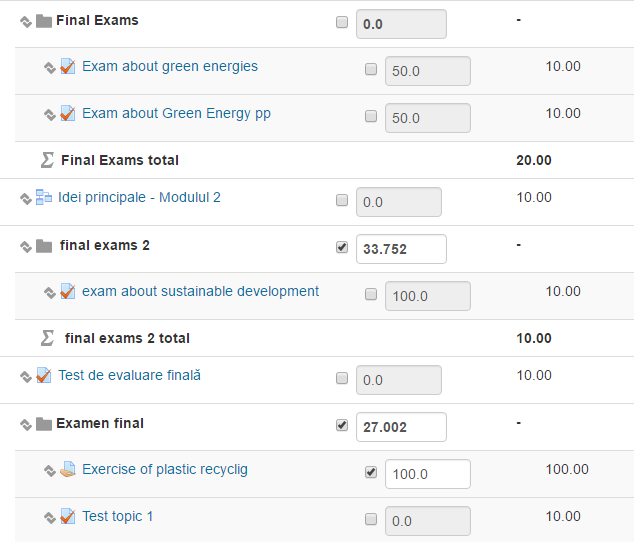
By default, the weights are distributed evenly, so that every activity has the same impact towards the final mark. We can modify it by checking the checkbox and manually typing the weight (as percentages).
We can also change the evaluation system by finding the course name in this page (the first line of the table) and clicking Edit.

Inside we can change the aggregation of the grades (mean, median, lowest or highest grade, etc.) as well as the grade type and the maximum and minimum grade.
In the case of blended learning where face-to-face exams may happen, we can add its grades and weights through the Add grade item button at the bottom. The gradebook will then considerate it when calculating the final mark.

